.png?width=200&height=32&name=Logo_amaran_Blue_20240811a%20(3).png)
This article covers the on-device interface, buttons, and knobs of the amaran Halo 200x, 300x, and 600x, along with every option in the main menu and the available control modes. For setup and mounting, see Getting Started.
Product Overview
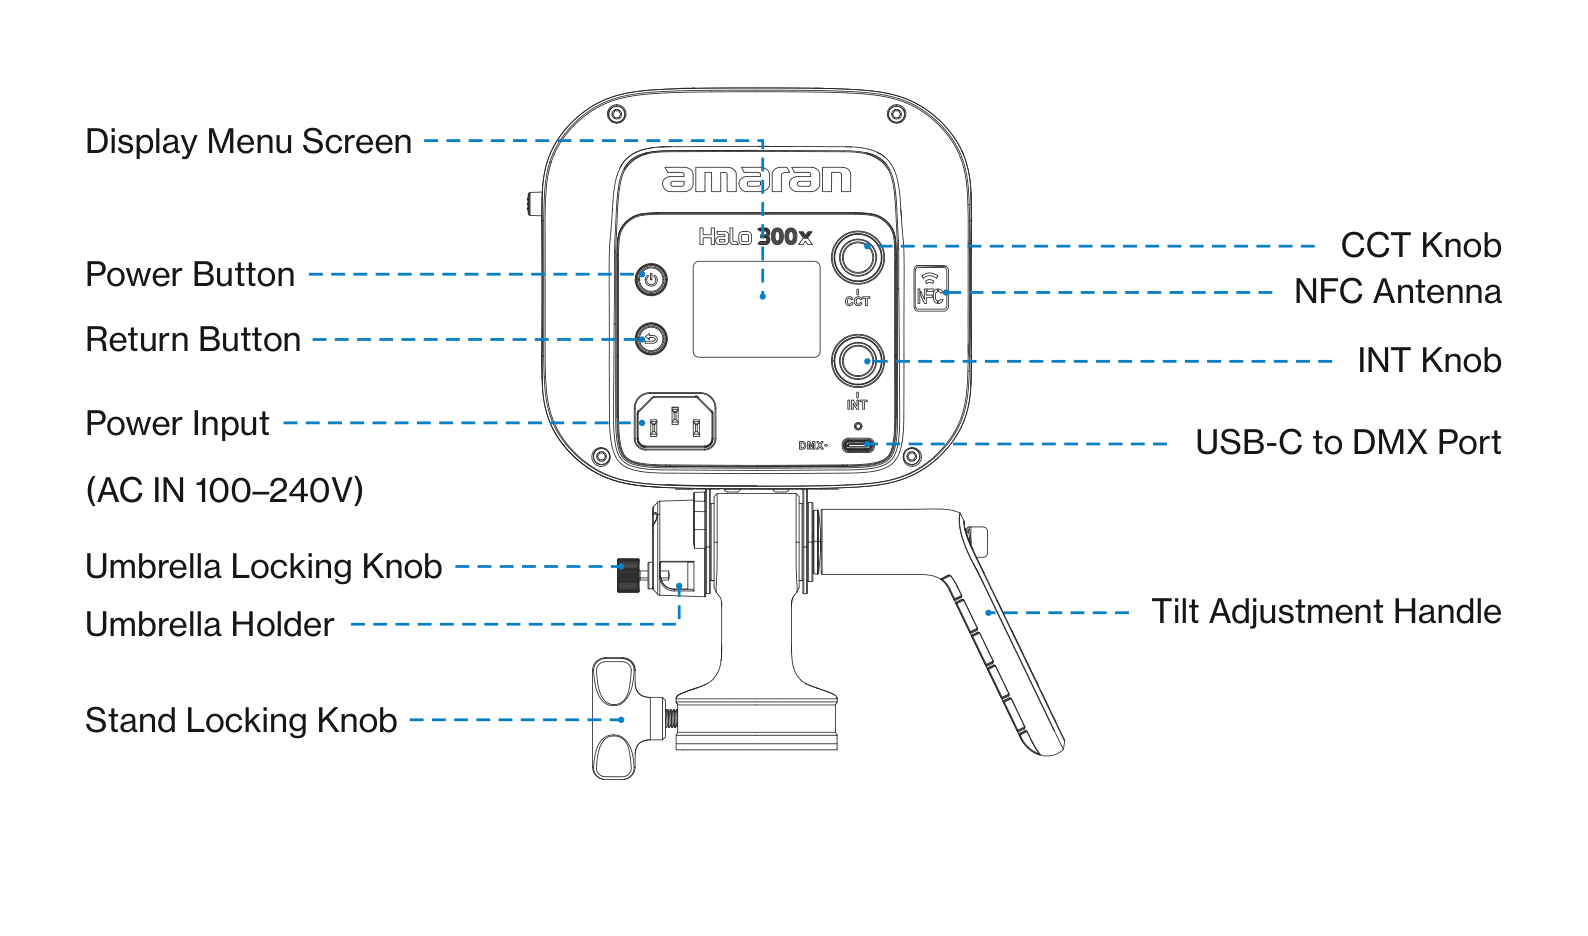
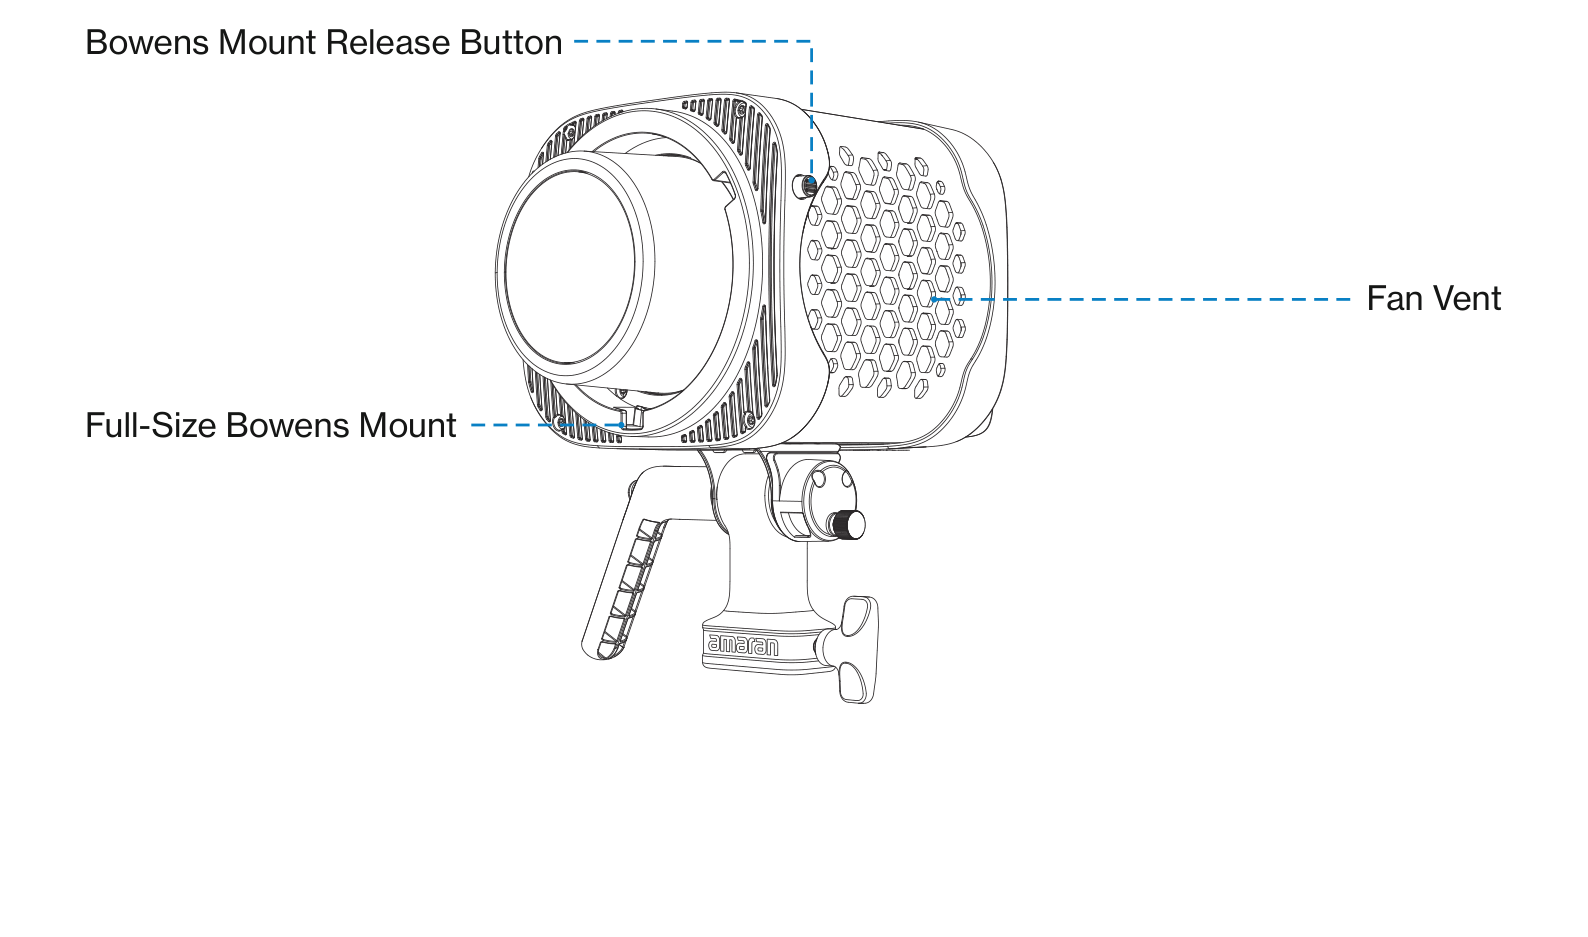
Buttons, Knobs & Ports
- Power Button: Press to turn the light on, press again to turn the light off.
- Return Button: Click to return to the previous menu screen.
- Display Menu Screen: Displays settings and status of your light.
- CCT Knob: In CCT Mode, rotate to adjust CCT. In other menu interfaces, rotate to toggle the menu or adjust values and lighting settings. Press the knob to confirm parameters.
- INT Knob: In any interface, rotate to adjust brightness. Press to switch to CCT mode.
- Power Input (AC IN 100 to 240V): Supports a universal voltage range to provide stable mains power to the light.
- USB-C to DMX Port: Connect the USB-C to 5-Pin DMX In&Out Adapter to achieve wired DMX control. This fixture's USB-C port does not support power delivery or firmware updates. (The amaran USB-C to 5-Pin DMX In&Out Adapter is sold separately.)
- Tilt Adjustment Handle: Used to adjust the tilt angle of the fixture. Turn clockwise to lock and counterclockwise to loosen. Pull out the handle to reposition its angle for easier operation from different directions.
- Stand Locking Knob: Secures the fixture to the light stand and prevents wobbling or detachment.
- Umbrella Holder: Compatible with umbrella accessories such as soft umbrellas or reflectors with a shaft diameter of up to 9mm.
- Umbrella Locking Knob: Tightens to secure the umbrella shaft and prevent slippage.
- NFC Antenna: Used for NFC pairing. When a smartphone is brought close to the light's NFC area, it can quickly trigger a Bluetooth connection, enabling seamless pairing and control via the amaran app without the need to manually search for the device.
- Full-Size Bowens Mount: Compatible with a variety of full-size, standard Bowens Mount accessories.
- Bowens Mount Release Button: Press to release the Bowens Mount accessory.
- Fan Vent: Helps the light dissipate heat. Please do not block the fan vent when using the light.
Main Menu
From CCT Mode, press the Return button to return to the main menu. Rotate the CCT knob to browse the menu items, and press it to enter a selection.
CCT Mode
After powering on, the fixture is in CCT mode by default. Rotate the CCT knob on top to adjust the color temperature. Rotate the INT knob on the bottom to adjust the brightness.
- INT (Intensity): Adjust your light's brightness from 0% to 100%.
- CCT (Correlated Color Temperature): Adjust your light's color temperature from warm white (2,700K) to cool white (6,500K).
- Short press the INT knob to quickly switch to CCT Mode, allowing fast adjustment of color temperature and brightness.
- In any interface, rotating the INT knob directly adjusts the brightness of the fixture.
FX (Lighting Effects)
In CCT Mode, press the Return button to return to the main menu. Rotate the CCT knob and press it to select and enter Effects Mode. Once in Effects Mode, rotate the CCT knob to browse the available effects, and press the knob to enter the selected effect settings.
Supported lighting effects: Fireworks, Faulty Bulb, Lightning, TV, Pulsing, Strobe, Explosion, Fire, and Paparazzi.
Bluetooth Reset
Rotate and press the CCT knob to enter BT mode from the main menu. Hold down the CCT knob until the end of the progress bar. Release the knob to cancel.
- A checkmark confirms the Bluetooth reset is successful.
- If the reset is unsuccessful, please reset Bluetooth again.
Studio Mode
In the main menu, rotate the CCT knob to select Studio Mode, then press the knob to enter the settings interface. Rotate the CCT knob to toggle between On and Off, and press the knob to confirm the selection.
When Studio Mode is enabled, the light will automatically turn on upon connecting to power, without the need to manually press the power button.
LANG (Language)
In the main menu, rotate the CCT knob to select Language, then press the knob to enter the settings interface. Rotate the CCT knob to switch between English and Chinese. Press the confirm button to confirm your selection.
DMX Control Settings
Insert the USB-C connector of the amaran USB-C to 5-Pin DMX In&Out Adapter into the USB-C port of the fixture, and tighten the locking screw to secure the connection. Velcro straps can be used to secure the adapter in an appropriate position, ensuring stability during use. The USB-A port on the adapter provides a 5V/1A power output.
To enter DMX Mode, rotate the CCT knob and press it to select DMX Mode from the main menu. Once inside, rotate the knob to toggle between the following options:
- DMX Status Display: View the current DMX address and selected DMX configuration.
- DMX Address: Set the DMX start address of the fixture, ranging from 1 to 512.
- DMX Signal Loss Behavior: Choose how the fixture responds to DMX signal loss. Options include Hold Last State, Instant Off, Fade Out, or Hold for 2 Minutes then Fade Out.
- DMX Profile: Select the desired DMX channel profile. For detailed configuration files, please refer to the official documentation.
The amaran USB-C to 5-Pin DMX In&Out Adapter is sold separately.
Fan Mode
In the main menu, rotate the CCT knob to select Fan Mode, then press the knob to enter the settings interface. Rotate the dial to toggle between Silent, Smart, and High fan mode. Press the knob to confirm your settings.
- Silent Mode: The fan will be completely turned off, and the light will not produce any noise. To ensure safe operation, the amaran Halo 200x maximum power will be limited to 40W, and the amaran Halo 300x maximum power will be limited to 42W.
- Smart Mode: The fan speed will automatically adjust according to the temperature of the light.
- High Mode: The fan runs at maximum speed to provide enhanced cooling performance, ideal for high-load scenarios.
Firmware Update
Firmware updates can be performed online via the amaran app, ensuring your device stays up to date with the latest features and performance improvements. The About screen displays the current software (SW) and hardware (HW) versions.
Pairing via NFC
To pair your light to the amaran app via NFC, open the amaran mobile app, tap the + sign, and select NFC Add Device. Place the NFC sensor area of your phone to the fixture's NFC tag. Hold your phone still until the fixture has been detected and successfully paired before removing your phone.
Even if the light is powered off, pairing via NFC is still supported. The light will automatically connect to the app once it is turned on.
Using the amaran App
You can download the amaran mobile app from the iOS App Store, Google Play Store, and other platforms for enhancing the functionality of the light. You can also download the amaran desktop app for Mac and Windows from the amaran website. Please visit amarancreators.com for more details on how to use the app to control your amaran lights.