.png?width=200&height=32&name=Logo_amaran_Blue_20240811a%20(3).png)
This guide walks you through powering, mounting, and turning on your amaran Pano 60c for the first time, along with installing the included light-shaping accessories.
Powering the Light
The amaran Pano 60c can be powered three ways. The light supports USB PD3.0 and above, but is not compatible with some third-party proprietary charging protocols, so choose your power supply carefully. If the selected power supply cannot power the light at full output, a pop-up window will appear on the display and the maximum brightness will be limited.
Method 1: Included Power Adapter
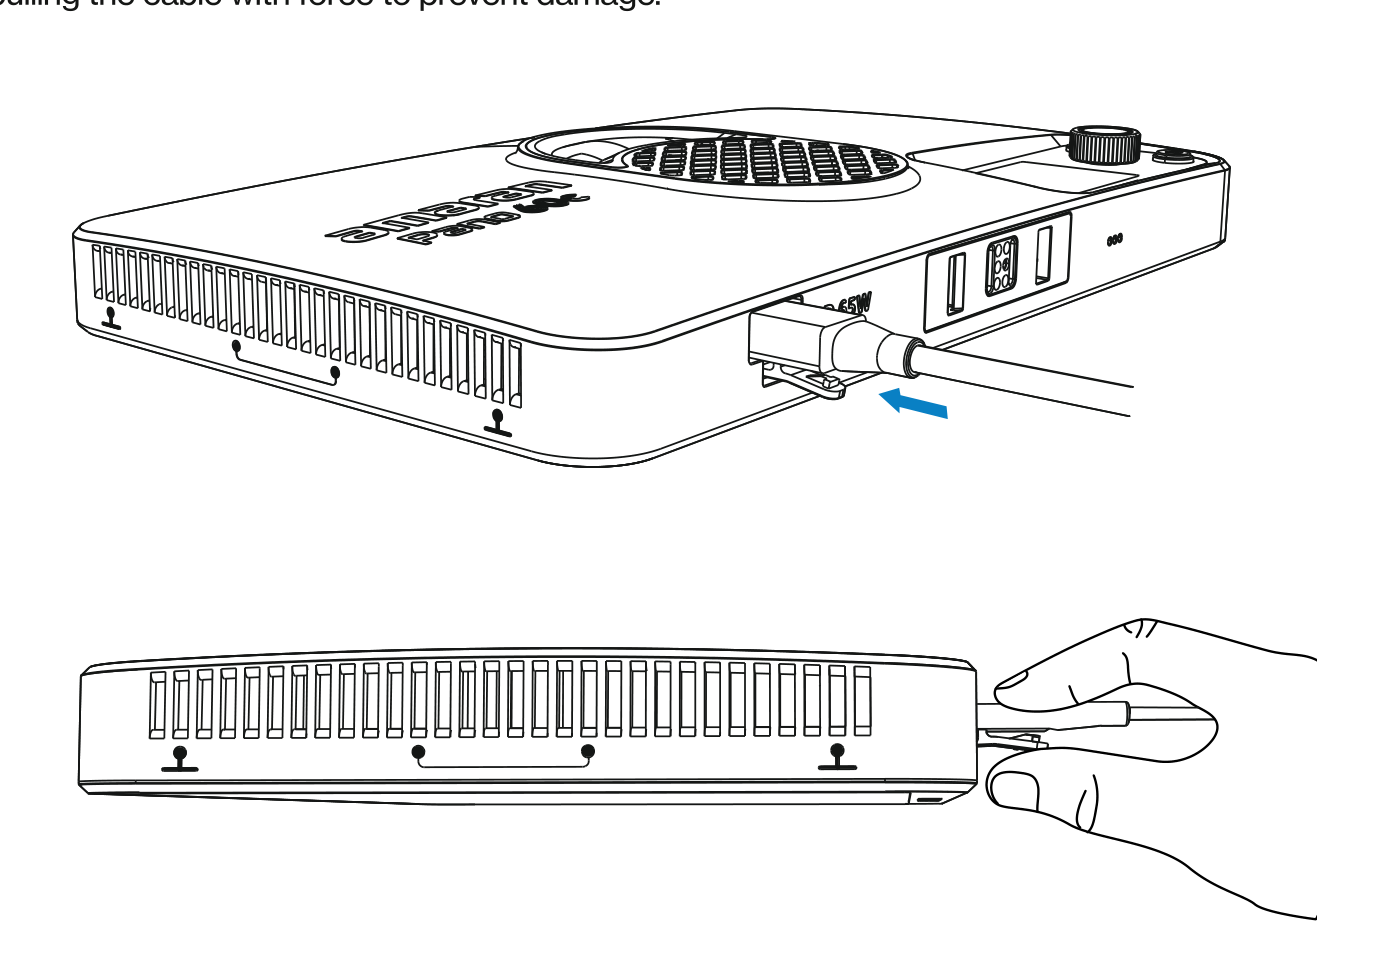
Use the included amaran 65W USB-C PD Locking Power Adapter. Plug the adapter into the USB-C Charging Port on the light. The Locking Power Adapter is pull-resistant: press the lock when inserting and removing the cable, and avoid pulling the cable with force to prevent damage.
Method 2: PD Power Supply or Power Bank
Power the light with another PD power supply device or power bank. Plug the output port of the PD device into the USB-C Charging Port on the light. Please ensure the power bank can output a minimum of 36W. If a power bank below 65W is used, the brightness will be reduced or the light may be unable to turn on.
Method 3: amaran Peak Portable Power
Power the light with the amaran Peak portable power supply. The battery handle features amaran Ace E-Lock Contact Pins and will power the light on when mounted via the amaran Ace E-Lock Quick-Release Mount. The amaran Peak power bank accessory is sold separately.
Turning the Light On and Off
- After connecting to a power supply, press the power button on the back of the fixture to turn the light on. Hold for 1 second to turn the light off. The light resumes its previous settings from before it was turned off.
- The first time you turn the light on, you can select your preferred language. Rotate the knob to select your language, then click to confirm.
Mounting the Light
Installing the amaran Ace Lock Adapter
Align the contact pins on the mounting bracket to the light's amaran Ace Lock quick-release mount. Press the blue release key and push towards the bottom of the light. The bracket is securely attached when the pins are embedded into the mount and you hear a clicking noise. Ensure the blue release key faces the back of the light to avoid reverse installation.
Installing onto a Light Stand
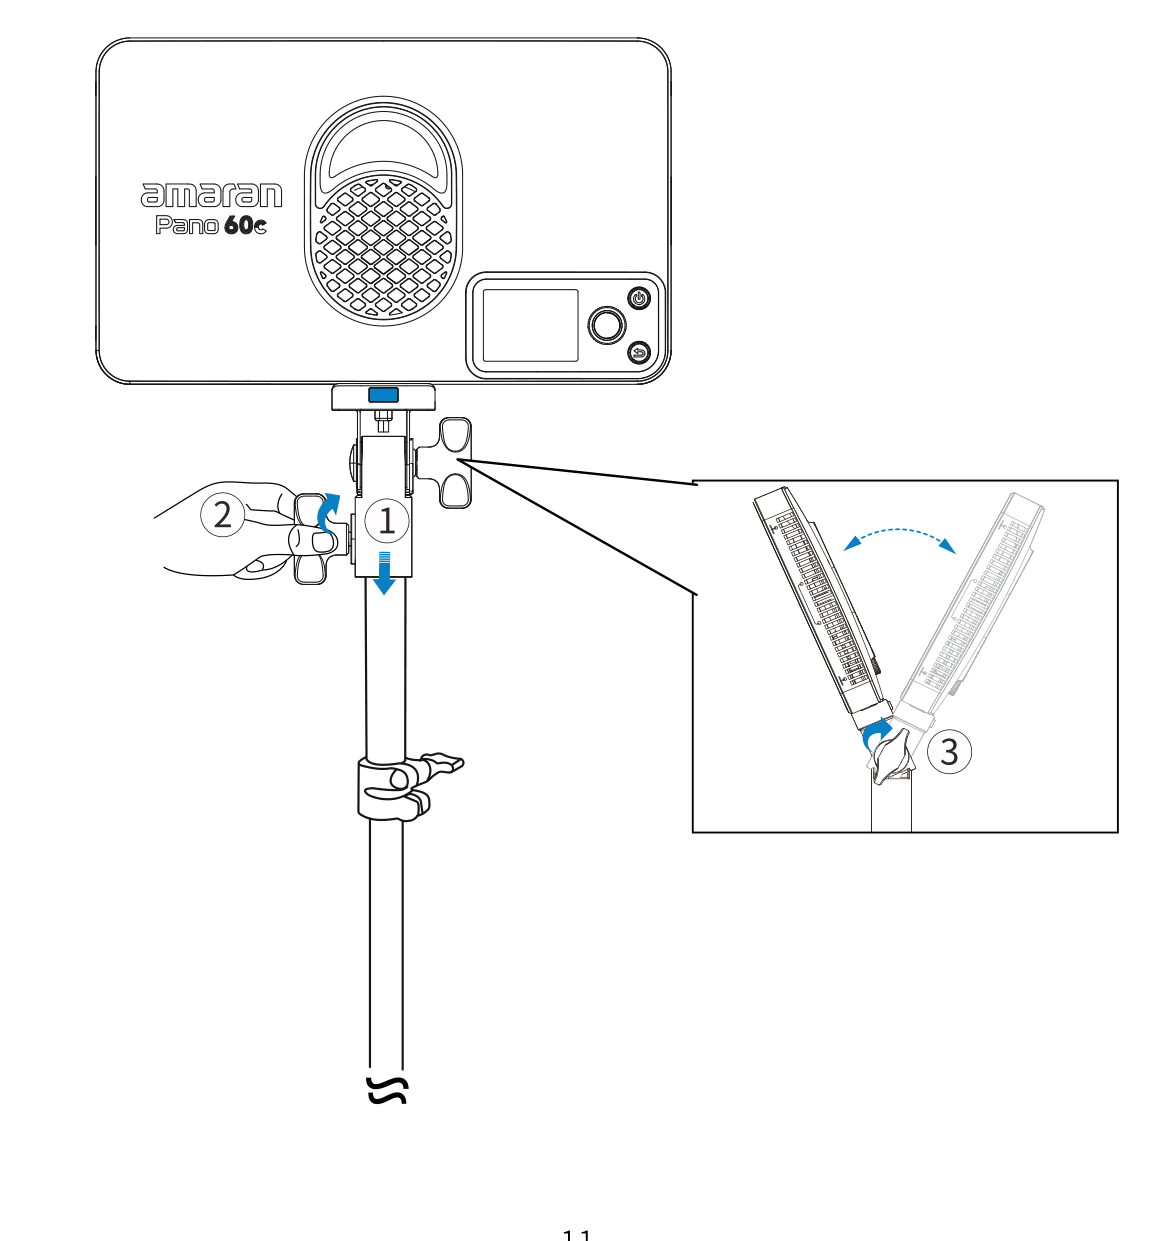
With the mounting bracket installed on the light, place the end of the bracket onto the light stand and turn the locking knob to secure it in place. Adjust the angle of the light and turn the tilting bracket knob to secure it.
Disassembling the Light
To disassemble, press the blue release key on the mounting bracket and pull the light upwards away from the bracket. To avoid damaging the light and bracket, do not disassemble by force.
Installing via 1/4-20in Screw Mount
The top of the light features a 1/4-20in screw mount for mounting the light onto 1/4-20in tripods or other equipment.
Installing Light-Shaping Accessories
Softbox
- Unfold the softbox and place the diffusion cloth side downwards onto a flat surface.
- Place the light with the light-emitting surface downwards onto the softbox frame. Pull the handles on the sides to ensure the softbox is fully unfolded and the light is firmly installed into the frame.
- Pull the elastic straps over the light. Adjust the position so the edges of the softbox align with the edges of the light.
Note: To prevent the softbox from blocking the fan and affecting heat dissipation or light spill, ensure the softbox securely wraps around the edges of the light.
Light Control Grid
- Ensure the softbox is fully opened before installing the light control grid.
- Expand the grid and align it with the 4 corners of the softbox.
- Fasten the Velcro around the grid to the softbox and ensure it is flat.
Diffuser
- Unfold the diffuser and pull the hook side towards the light.
- Place the hook on the side of the diffuser into the light's heat dissipation hole. Repeat on the other side to securely install the diffuser cover.
Note: Ensure the diffuser is positioned correctly to prevent it from exceeding the edges of the light.
Barn Doors (sold separately)
- Ensure the barn door leaves are closed and place them facing downwards on a flat surface. Place the light into the frame of the barn doors.
- Place the wire clasp into the light's heat dissipation hole. Repeat on the other side to securely install the barn doors.