.png?width=200&height=32&name=Logo_amaran_Blue_20240811a%20(3).png)
The amaran Peak is a 170W-rated portable power solution designed for on-the-go content creation. It supports up to 140W max input fast charging and 170W max output fast charging, and pairs premium lithium-ion cells with advanced power management to deliver strong safety, efficiency, and compatibility in a lightweight body.
The amaran Peak features automatic charging and discharging detection, so there is no need to press a button to start powering a device or begin recharging. Combined with the included amaran Ace E-Lock Expansion Module, it can power and control compatible amaran lighting products directly, with no separate power cable.
What's in the Box
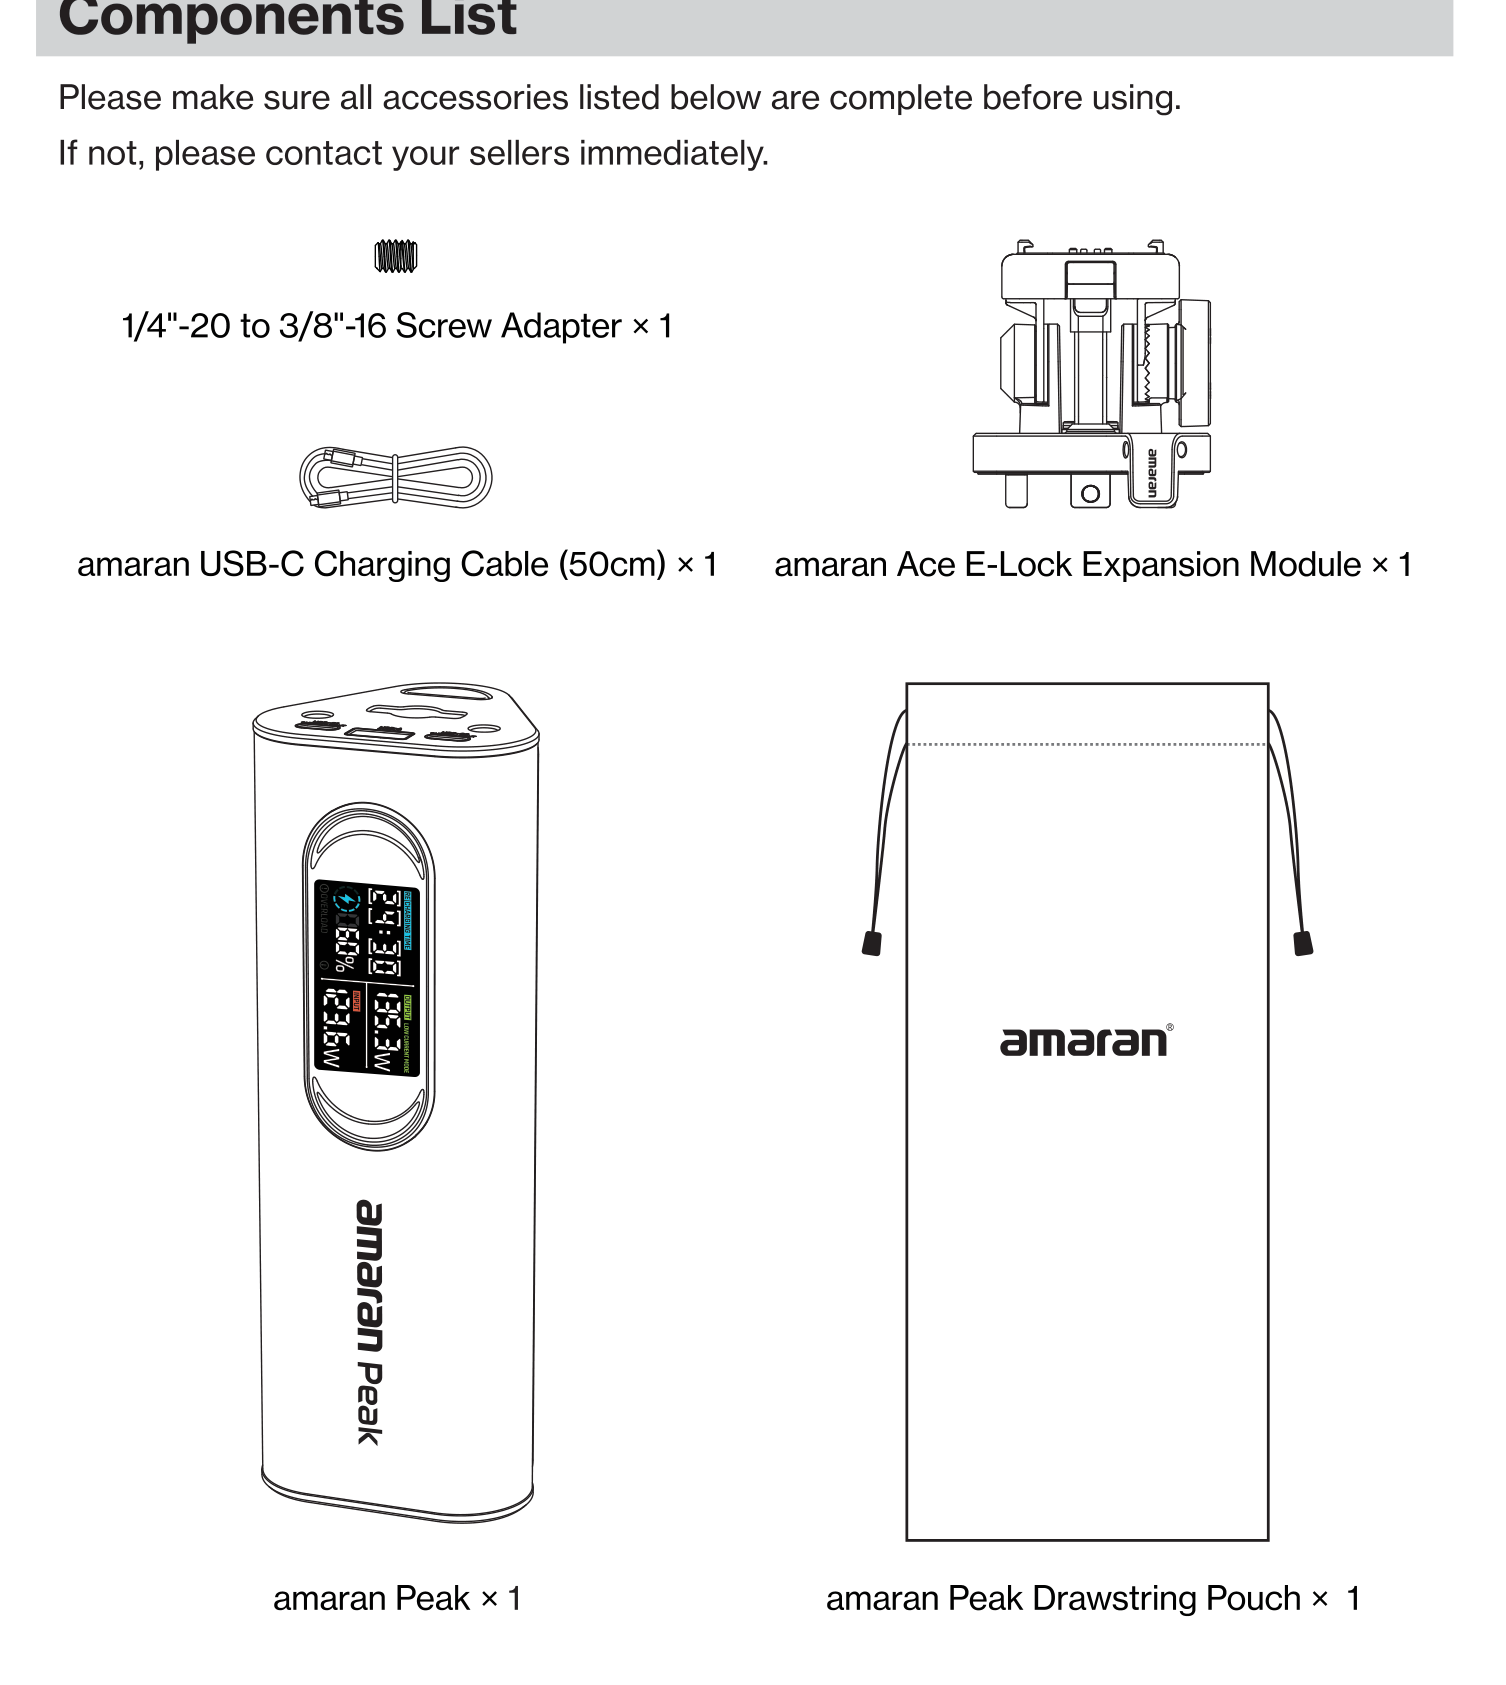
- amaran Peak x 1
- amaran Ace E-Lock Expansion Module x 1
- amaran USB-C Charging Cable (50cm) x 1
- 1/4"-20 to 3/8"-16 Screw Adapter x 1
- amaran Peak Drawstring Pouch x 1
Optional Accessories (Sold Separately)
- amaran Peak Light Stand Clamp
- amaran Ace E-Lock Adapter (1/4" and 3/8" screw compatible)
- amaran USB-C to DC 20V Power Adapter Cable (300cm)
- amaran USB-C Charging Cable (150cm)
Product Overview
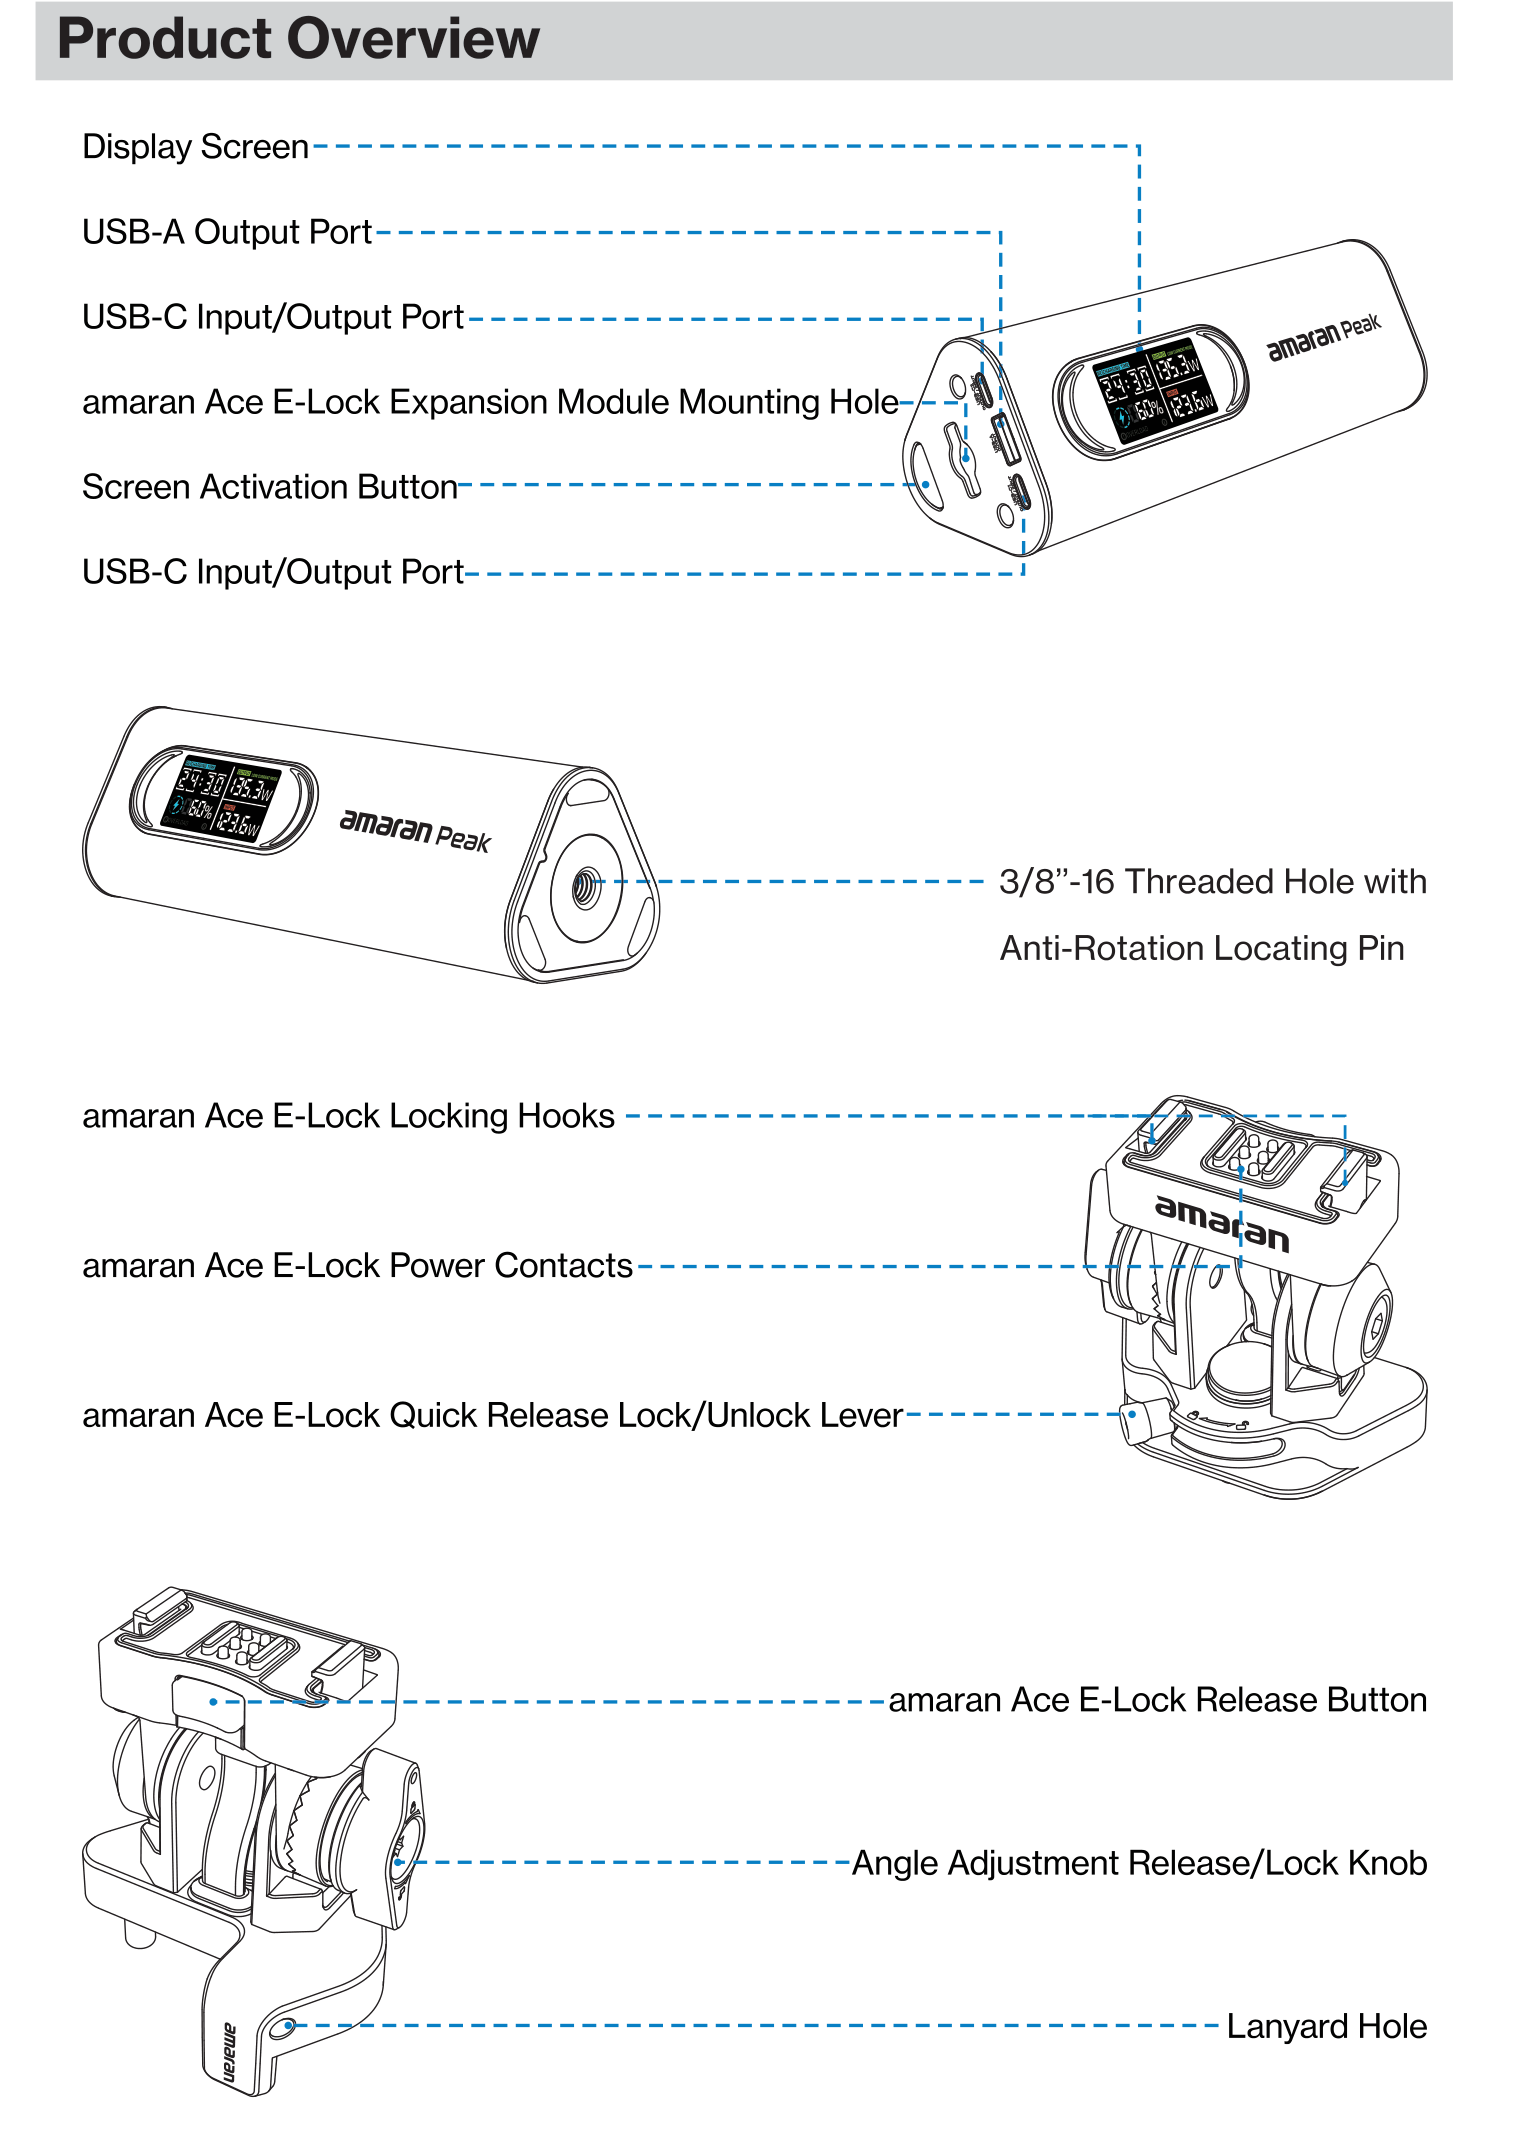
The amaran Peak main unit provides two USB-C Input/Output ports (labeled C1 and C2), one USB-A Output port, a color Display Screen, and a Screen Activation Button. On top is the amaran Ace E-Lock Expansion Module Mounting Hole. The base has a 3/8"-16 threaded hole with an anti-rotation locating pin for stable mounting.
The amaran Ace E-Lock Expansion Module adds Locking Hooks, Power Contacts, a Quick Release Lock/Unlock Lever, a Release Button, an Angle Adjustment Release/Lock Knob, and a Lanyard Hole.
Installing the amaran Ace E-Lock Expansion Module
- Move the lever to the unlock position.
- Align the positioning pin of the amaran Ace E-Lock Expansion Module with the positioning hole on top of the amaran Peak.
- Slide the module in until it is fully seated.
- Rotate the lock/unlock lever clockwise until you hear a click or feel it engage, indicating the module is securely locked.
Removing the Module
- Unlock the lever: pull the lock/unlock lever outward while rotating it counterclockwise until it reaches the limit.
- Remove the module: gently pull the module outward to separate it from the amaran Peak.
Angle Adjustment
- Unlock the angle: rotate the angle adjustment knob counterclockwise approximately 90 degrees to release the lock.
- Adjust the angle: move the module to the desired angle.
- Lock the angle: rotate the knob clockwise approximately 90 degrees to lock it securely.
Connecting amaran Lighting Products
1. Quick Connection via amaran Ace E-Lock
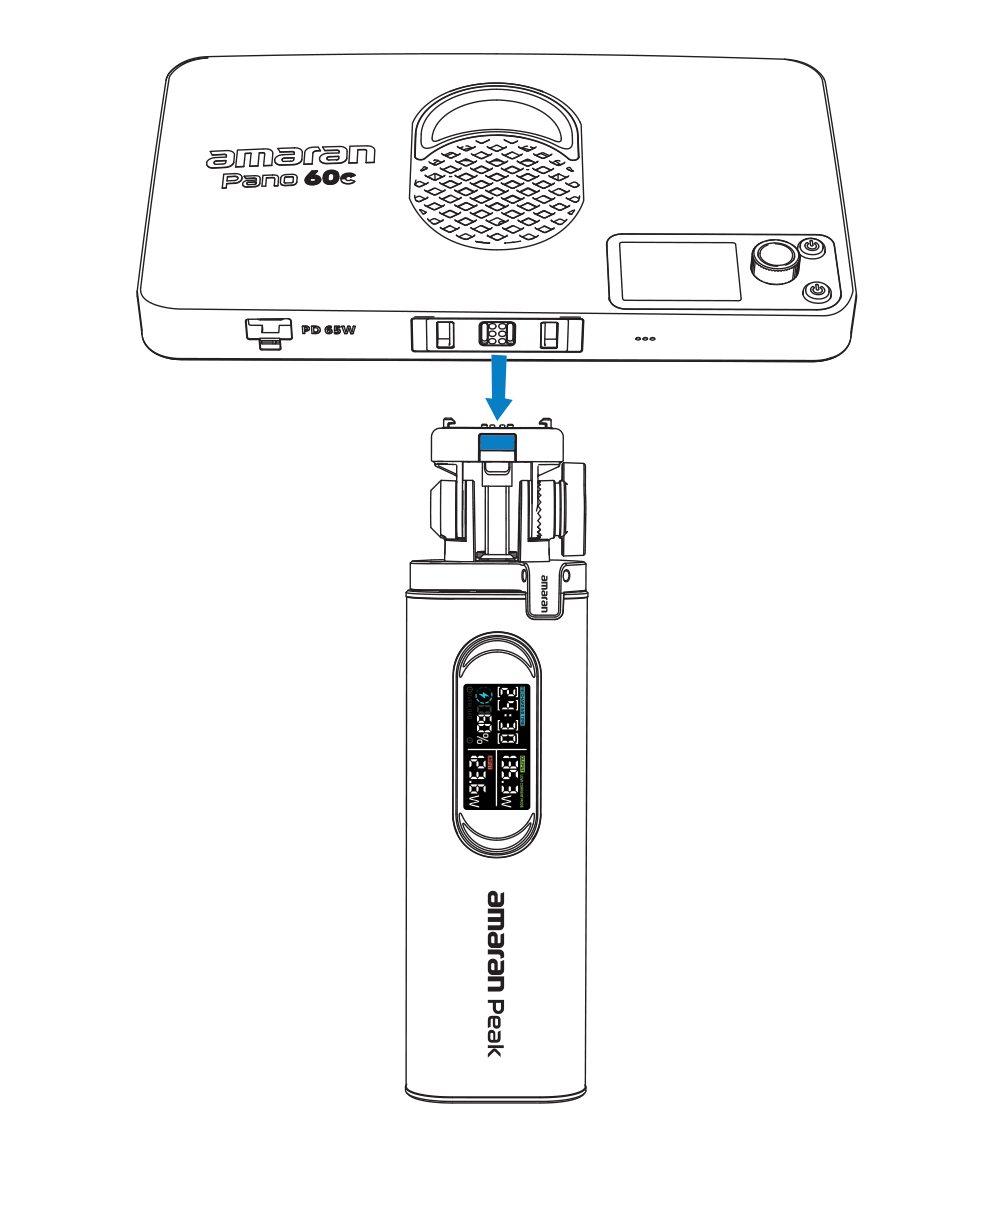
When connecting a light fixture to the amaran Peak, ensure the blue release button is facing the back of the fixture. Align the Ace E-Lock hooks on the amaran Peak with the mounting socket on the fixture, then press the fixture straight down firmly until you hear a click. When you hear the click, the connection is secured. No additional power cables are required, as the fixture receives power directly through the Ace E-Lock connection. To disconnect, press the blue release button and simultaneously pull the fixture downward to detach.
2. Connecting Other Fixtures via the amaran Ace E-Lock Adapter (Sold Separately)
Align the amaran Ace E-Lock Adapter with the Ace E-Lock claw on the amaran Peak and the Ace E-Lock mount on the lighting fixture. Press straight down until you hear a click, indicating the adapter is securely locked in place. This adapter allows compatibility with lighting fixtures that have 1/4" or 3/8" screw holes and can be powered and controlled according to the fixture's requirements. To detach, press the blue release button and pull the amaran Peak downward to separate.
3. Install the amaran Peak Light Stand Clamp and Connect via USB-C Cable (Sold Separately)
Loosen the locking screw to open the clamp to a suitable size. Attach the clamp securely to the light stand and tighten the screw. Place the amaran Peak into the clamp and secure it with the silicone strap. To detach, pull the silicone strap in the opposite direction to release and remove the amaran Peak.
4. Connect Non-USB-C Fixtures via the amaran USB-C to DC 20V Power Adapter Cable (300cm) (Sold Separately)
This trigger cable delivers up to 100W max output at up to 20V / 5A, from a USB-C input to a 5525 locking DC connector (outer diameter 5.5mm / inner diameter 2.5mm).
Insert the USB-C end of the trigger cable into the C1 or C2 port on the amaran Peak. Insert the DC end into the DC power port of the target fixture and tighten the locking nut to secure the connection.
Note: The actual output voltage depends on the connected power source. Before use, ensure the target fixture supports the output voltage. If the fixture's maximum input voltage is lower than the output voltage of the trigger cable, damage may occur.
Reading the Display
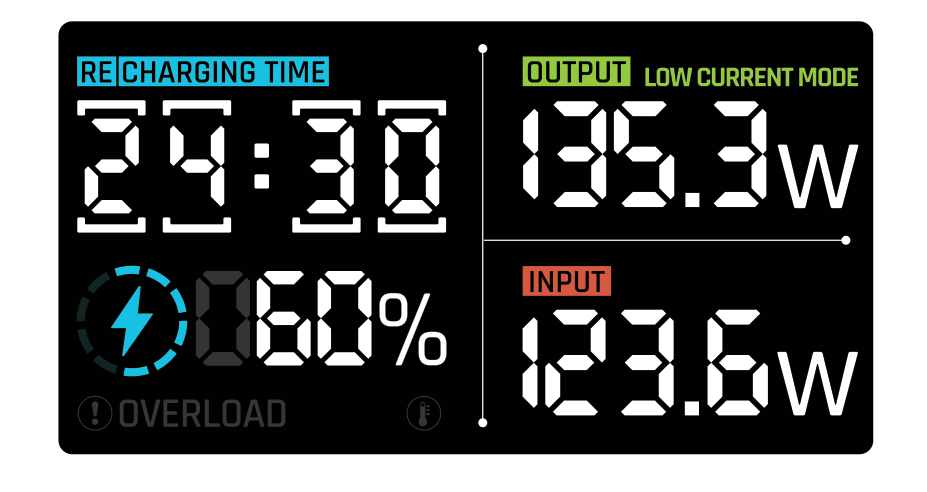
Press the Screen Activation Button to wake the display. The screen shows several areas at once:
- Recharging Time: displays the remaining charging time when charging, or the remaining discharging time when powering a device.
- Battery Percentage: the lightning icon and a 10-level rim outline show the current battery level. Each bar represents 10%, and the next bar blinks while the battery is between levels.
- Output: the OUTPUT icon lights up while discharging and shows the real-time total output power in watts.
- Input: the INPUT icon lights up while charging and shows the real-time total input power in watts.
- Low Current Mode: the LOW CURRENT MODE icon lights up when that mode is active (see below).
- Warnings: the exclamation mark blinks and the RECHARGING TIME text blinks to show an error code when a system error occurs. The thermometer icon indicates overheating: a slow blink (once per second) means the temperature is high and power is limited; a fast blink (every 0.3 seconds) means the temperature is too high and input and output are shut off.
Button Operation
- Power on / off: long-press the button.
- Low Current Mode: double-press the button to activate it (the indicator flashes). Double-press again to exit. It also exits automatically after 2 hours of standby.
Under normal conditions, when the output current drops below approximately 60mA (plus or minus 30mA), the device shuts off automatically. This is not suitable for charging low-power devices like smartwatches or wireless earbuds. Activating Low Current Mode keeps charging such devices; the mode exits by double-pressing the button again or automatically after 2 hours without a load.
Specifications
| Specification | Detail |
|---|---|
| Battery Capacity (Typical / Rated) | 24000mAh / 22800mAh (86.4Wh / 82.08Wh) |
| Rated Capacity | 13200mAh (5V/3A) |
| Conversion Efficiency | ≥78% |
| Rated Input (USB-C1 / USB-C2) | 5V/3A, 9V/3A, 12V/3A, 15V/3A, 20V/5A, 28V/5A (140W Max each) |
| Rated Output (USB-C1 / USB-C2) | 5V/3A, 9V/3A, 12V/3A, 15V/3A, 20V/5A, 28V/5A (140W Max each) |
| Rated Output (USB-A) | 5V/3A, 9V/3A, 12V/2.5A (30W Max) |
| Combined Output (C1 + C2) | 100W + 65W |
| Combined Output (C1 + A) | 140W + 30W |
| Combined Output (C2 + A) | 140W + 30W |
| Combined Output (C1 + C2 + A) | 65W + 65W + 18W |
| Total Output | 170W (Max) |
| Main Unit Dimensions (without expansion module) | 176 x 64 x 61 mm |
| Ace E-Lock Expansion Module Dimensions | 69.2 x 61 x 50.2 mm |
| Main Unit Weight (without expansion module) | ≈791g |
| Ace E-Lock Expansion Module Weight | ≈243g |
Important Safety Notes
- Read and understand all safety instructions before use.
- Operating temperature should be maintained between 0°C and 25°C (32°F to 77°F). Store the product in a cool, dry place, away from high temperature, humidity, and direct sunlight.
- It is normal for the product to heat up during use.
- Only use manufacturer-recommended or certified power adapters and USB-C cables.
- Do not immerse the product in water or other liquids, and do not continue using it after it has been submerged.
- Do not disassemble the product yourself. If repair or service is needed, contact authorized service personnel; damage caused by unauthorized disassembly is not covered by warranty.
- Do not expose the battery to fire or extremely high temperatures. Batteries may explode or leak flammable liquid or gas under extreme pressure changes or high temperatures.
- If any abnormal condition occurs (such as overheating, smoke, or a strange odor), disconnect power immediately and stop using the product.
- Always power off the device and ensure safety before installing or adjusting any accessories. Using unauthorized accessories may cause malfunction or personal injury.
- If the device is unused for a long time, fully charge and discharge the battery every three months to maintain battery health.
- Clean the device with a soft, dry cloth. Do not use solvents or chemical cleaners.